Naturally Sweet...JUGS35 42

Mona Pendleton | Friday, May 28, 2010 @ 8:57 PM | , ,

Hi There! Time again for another Wild Card Challenge with Just Us Girls. This week Alicia is the Hostess & is challenging us all to incorporate dry embossing when creating.

I made this card for my sister, Tina who will be loving my 2 fur babies & keeping an eye on my house when I am gone on a few upcoming summer vacations ;) I think this is a fun & sweet non-traditional thank you card. What are your thoughts?

Dry embossing is such a crazy popular technique whether you use a Spellbinders Impressabilities™ template ;), an old fashioned scoring tool & ruler, a score board, a light table & stylus, etc.... Whatever product/method you use, we sure would love to see it!

To incorporate dry embossing on this card, I embossed a piece of F-001 Red Premium Craft Foil using the I2-1012 Cherries Impressabilities™ template. If you have never attempted this combo, I suggest you give it a try! It is super easy & the results are stunning! If you haven't already & would like to see a tutorial I shared on a previous post, please feel free to click HERE. I am really have fun using Tattered Angels Glimmer Mist these days! Briefly to make the pear you see here, I sprayed Glimmer Mist on a plain piece of cs, dried with craft dryer, stamped with a stamp from the Waltzingmouse Pic-Nic Patterns set, (which by the way comes with some fun, versatile background images), then cut out using a Shapeabilities™ S4-268 Nested Pear die template. (Just in case you like the I2-1012 Cherries Impressabilities™ template &/or the Shapeabilities™ S4-268 Nested Pears die templates they are Limited Edition products & you know what that means! When they are gone, they are gone! I'm just sayin'!

For all the details, please visit the Just Us Girls challenge site & be sure to visit ALL the DT girls (found on my side bar) as well as LeAnne & Teresa! Once you have your project photographed, be sure to go to Just Us Girls and post a direct link to your project on our site. If you upload to on online gallery, please be sure to label your project as JUGS35.

Deadline to be considered for the weekly "Chic of the Week" will be 9:00 PM EST on Thursday, June 3rd. Our Inlinkz tool will also close at that time. Our top pick "Chic of the Week" will be announced on Friday morning following the deadline.

Supplies Used:

Stamps: Waltzingmouse Pic-Nic Patterns, Sweet Hearts

Paper: graphic45, K&Company, Papertrey Ink

Ink: Tattered Angels Caramel Apple Glimmer Mist, Memento, Ranger

Other: Spellbinders™ Nestabilities S4-161 Labels One, Shapeabilities™ S4-268 Nested Pears, S3-150 Ribbon Tags Trio, I2-1012 Cherries Impressabilities™, F-001 Red Premium Craft Foil, W-001 The Wizard™, Husqvarna sewing machine, brads, ribbon & sanding tool from stash

post signature

Read More

You're In My Thoughts...PDCC31 50

Mona Pendleton | Wednesday, May 26, 2010 @ 9:00 PM | , , ,

Hi Everyone! It's time for another color challenge at The Play Date Cafe. Julie chose this week's color palette. I needed a Sympathy card for my dear friend Sue in Buffalo, NY who recently suffered the loss of her sister-in-law. I can't even imagine what she is experiencing& my heart goes out to her & her family.
I was drawn to the soft pastel lavender hues & creamy caramel colors in this gorgeous inspiration photo. It is really interesting & fun to see what colors trigger others MOJO focusing on the same photo.I was inspired to create a frame using a combination of a Spellbinders™ Labels Ten & Petite Ovals LG die templates by my Cyber-friend Beate. If you ever want to learn a new technique, I highly recommend you stop by her blog (click HERE) or you can find her at Splitcoaststampers.com She has soooo many tricks up her sleeve & willing shares her expertise!

To create the label frame first I sprayed Tattered Angels Glimmer Mist to a piece of cs & dried it immediately with my hand held craft dryer, being careful not to start a fire or get a 3rd degree burn on my fingers! I wish you could see the beautiful shimmer left on the frame! Then I inked up & stamped a Waltzingmouse image from the Very Vintage labels No. 10 set (that fits flawlessly with the Spellbinders™ Labels Ten die templates), positioned & secured both die template, cut & embossed using The Wizard™. I also adventured & made my own Vintagey seam binding! Piece of cupcake :)

I hope you can join along with this week's creativity challenge. After you have made your project, please head on over to The Play Date Cafe & link your post. If you post your creations in an on-line gallery, please label it PDCC31 so we won't miss them! Be sure to see what all The Play Date Cafe DT girls have created, (listed on my side bar). I hope you come join the fun! Thanks for looking! Be Sweet :)

Supplies Used:

Stamps: Waltzingmouse Very Vintage labels No. 10, Words of Wisdom, Big Blooms

Paper: K&Company, Stampin' Up, Papertrey Ink

Ink: Tattered Angels Caramel Apple, Pashmina, Popsicle Glimmer Mist, Colorbox Chalk White, Ranger, Memento

Other: Spellbinders™ Nestabilities S5-122 Labels Ten, S4-138 Petite Ovals LG, S4-171 Nested Butterflies, S4-109 Flower Creations Three, I2-006 Floral and Stone Impressabilities™, W-001 The Wizard™ Making Memories brad, Martha Stewart pearls, seam binding, brad, button from stash, Husqvarna sewing machine

post signature

Read More

Bonjour Everyone! 49

Mona Pendleton | Monday, May 24, 2010 @ 12:00 PM | , , ,

Here today to share a card that I made combining many of my favorite things :)

I was inspired to create this Bonjour card by the Paris themed challenge that the girls over at the City Crafter Challenge Blog have going on this week & for sketch inspiration, I used Kazan's awesome sketch from 2Sketches4You which by the way, are celebrating their 2 year Anniversary. Happy Anniversary girls! - Love your sketches - please keep'em comin' :)


To create this tag, I used: a Spellbinders™ Nestabilities Mega Oval LG die template which showcases this Waltzingmouse Bonjour sentiment: perfect for the Paris theme :)

I have been playing around with various techniques & one I am really lovin' is sponging within a Spellbinders™ die template. It's super easy & creates such a fantastic look. Thanks for looking!

If you would like to see some photos from a trip that my hubby & I took to Paris in 2005, please continue to scroll down past the supply list :) I asked once before on a previous Paris inspired card if any of you have ever been to Paris & some shared some awesome experiences with me! I'd love to hear about your adventures to or thoughts of Paris :)

Supplies Used:

Stamps: Waltzingmouse Fancy Phrases, Tattered Angels Vintage Seasons

Paper: K&Company DP, Papertrey Ink

Ink: Memento Tuxedo Black, Stampin' Up, Ranger Vintage Photo

Other: Spellbinders™ Nestabilities S5-015 Large Deckled Mega Rectangles, S5-014 Small Deckled Mega Rectangles, S5-023 Mega Ovals Large, Melissa Frances Vintage embellishment, Prima flower, ribbon & lace from stash

The Eiffel Tower at night

My hubby, Scott :)

A view of Paris from the Eiffel Tower:

An interesting view from below:

If you look closely, you can see the sign when Paris was bidding for the Olympics:


post signature

Read More

Tea Party time...JUGS34 47

Mona Pendleton | Friday, May 21, 2010 @ 8:59 PM | , ,

Hi There! Hope you all had a great week! It's time for a template challenge with Just Us Girls! Dana is our Lovely Hostess & Lauren Owner/Designer of My Time Made Easy © is generously sponsoring this challenge. Not only has Lauren provided us all with a MTME © template to showcase but she is giving a free one away to one randomly drawn participant! You MUST play to win! :) Please feel free to use whatever template your heart desires or create one of your own! There are plenty of wonderful tutorials & samples located at Splitcoaststampers.com :)Here is my offering for the JUGS34 template challenge:
I used the MTME © Take Time Pocket template to create this lil' tea gift box.This is the complete Tea Party gift ensemble:For sketch inspiration, I used Laura's awesome sketch from 2Sketches4YouOne can never have too many scallops right? Well this sketch was the perfect match for a lovely double scalloped border using the Spellbinders™ S4-242 Big Scalloped Borderabilities™ Petite.The sweet sentiment comes from the new Waltzingmouse Afternoon Tea Sentiments set which prompted me to adorn this card with pearls :)

I will be celebrating Meri's (my step daughter) 13th Birthday pool party today along with 15-20 of her teenage friends! I may just have to sneak one of these tea bags from this set later tonight & enjoy :) Thanks for looking! Hope you all enjoy your weekend - Be Sweet!

For all the details, please visit the Just Us Girls challenge site & be sure to visit ALL the DT girls (found on my side bar) as well as LeAnne & Teresa! Once you have your project photographed, be sure to go to Just Us Girls and post a direct link to your project on our site. If you upload to on online gallery, please be sure to label your project as JUGS34.

Deadline to be considered for the weekly "Chic of the Week" will be 9:00 PM EST on Thursday, May 27th. Our Inlinkz tool will also close at that time. Our top pick "Chic of the Week" will be announced on Friday morning following the deadline.

Supplies Used:

Template: My Time Made Easy © Take Time Pocket

Stamps: Waltzingmouse Afternoon Tea, Afternoon Tea Sentiments

Paper: Melissa Frances DP, My Mind's Eye DP, Papertrey Ink cs

Ink: Copic marker RV11 Pink, Memento Tuxedo Black, Ranger Vintage Photo, Stampin' Up, VersaMark

Other: Spellbinders Nestabilities™ S4-192 Blossom, S4-116 Standard Circles SM, S4-114 Standard Circles LG, S4-242 Big Scalloped Borderabilities™ Petite W-001 The Wizard, white embossing powder, ribbon, button, pearls & twine from stash

post signature

Read More

happy 6th Anniversary...PDCC30 45

Mona Pendleton | Wednesday, May 19, 2010 @ 8:57 PM | ,

Hi Everyone! It's Thursday & you know what that means? It's time again for another Creativity Challenge at The Play Date Cafe & it's my turn to choose the color palette for PDCC30 :)
This happy Anniversary card is for my DH :) - we will be celebrating our 6th Wedding Anniversary in early June. While we were shopping at one of my favorite papercrafting stores, he spotted the "love birds" stamp that you see in the upper right hand corner ;) - so of course, I had to use it, especially on this card.

When I saw this beautiful bedding in the Pottery Barn catalog, I immediately thought what a fabulous inspiration photo it would make! So my hubby made it happen :)

I showcased an elegant Melissa Frances sticker inside a label cut with a Spellbinders™ Labels Eight die template. With a few "homespun" embellishments sprinkled about & a lil' stitching, my card was complete.

That's all I have for today :) I hope you can join along with this week's creativity challenge. After you have made your project, please head on over to The Play Date Cafe & link your post. If you post your creations in an on-line gallery, please label it PDCC30 so we won't miss them! Be sure to see what all The Play Date Cafe DT girls have created, (on my side bar) & our Guest Designer, Maile Belles. I hope you play along with these pretty pastels :) Thanks for looking! Be Sweet :)

Supplies Used:

Stamps: Waltzingmouse Off Beat Backgrounds, Sweethearts, Inkadinkadoo

Paper: Melissa Frances DP, Papertrey Ink

Ink: Memento Tuxedo Black, Ranger Vintage Photo, VersaMark

Other: Spellbinders™ Nestabilities S4-249 Big Scalloped Circles LG, S4-250 Big Scalloped Circles SM, S4-136 Classic Heart, S4-137 Classic Scalloped Heart, S5-019 Labels Eight, Melissa Frances Vintage Findings & sticker, ribbon, button, brad, glitter & twine from stash

post signature

Read More

Happy 1st Birthday Waltzingmouse & Meri! 93

Mona Pendleton | Monday, May 17, 2010 @ 8:00 AM | ,

Hi Everyone! Today I am waltzing along with Claire, Owner/Designer of Waltzingmouse Stamps, the Waltzingmouse DT & Friends in the Friends of Waltzingmouse Stamps Blog Waltz continuing the 1st Birthday celebration of Waltzingmouse Stamps.A Birthday celebration isn't complete without a cake! The Waltzingmouse A Piece of Cake Template is super easy to bake - oops - I mean make! LOL You can make a slice or an entire cake! Not only does this make for a beautiful display but it makes serves as a very useful, unique gift package.My family will be celebrating Meredith's, (my step-daughter), 13th birthday on Wednesday, May 19th :) I met Meredith when she was only 3 yrs old! Time sure does fly! I am putting a little gift in each slice - how fun is that?! :)

If you have a special admiration of Spellbinders™ die templates like I do ;) then you will surely love what Claire calls her "Nestie Friendly" stamps! I have said it before & I will say it again, "a match made in my stamping Heaven! :)"

In this close up photo you can see how fabulously the Spellbinders™ Labels Three die template fits flawlessly around the Waltingmouse embossed image.

I have been getting a lot of miles out of my Spellbinders™ Borderabilities die templates. Didn't know what I was missing! You can cut, emboss & stencil with the Borderabilities™ & they don't jam up, eating your paper, they are super light weight & require very little storage space!

For a close up look at just a slice, you can see how fun this template is to embellish with all your favorite papercrafing goodies! :) Green is Meredith's favorite color, I hope she likes her cake! This cake doesn't get my off the hook! Meri is having a pool party on Saturday with 16 of her friends - so I will be baking cupcakes :)

Thanks so much for waltzing by :) See you on the Waltz!

Supplies:

Template: Waltzingmouse A Piece of Cake

Stamps: Waltzingmouse Fancy Phrases, Very Vintage Labels No. 5, Very Vintage Labels No. 3

Ink: Memento Tuxedo Black, VersaMark, Ranger Vintage Photo

Paper: Gina K. Pure Luxury cs, Papertrey Ink, Stampin' Up DP

Other: Spellbinders™ Nestabilities S4-189 Labels Three, S4-249 Big Scalloped Circles LG, S4-250 Big Scalloped Circles SM, S4-242 Big Scalloped Borderabilities™ Petite, W-001 The Wizard, Cuttlebug embossing folder, brads, ribbon, pearls & embossing powder from stash

post signature

Read More

Old Glory...JUGS33 54

Mona Pendleton | Friday, May 14, 2010 @ 8:57 PM | , , ,

Hi There! Hope you all had a great week & are ready for the weekend! It's time for another color challenge with Just Us Girls. Sweet Lisa chose this week's color combo for JUGS32. Hope you come join the fun!

Using some Spellbinders™ Premium Craft Foil, I created the 3D flag! In case you missed the embossing metal tutorial I previously shared & are interested in learning how to use this amazing product, please feel free to click HERE for complete details!

"Old Glory", All American, Memorial Day, The 4th of July (Independence Day), Freedom & ALL the men & women in the past, present & future who have served, are currently serving & will serve in the United States military come to my mind when I think of these 3 colors.

For a lil' added dimension, I paperpieced the basket, the tablecloth, the flag & the stars. Cutting out those lil' images is hard on the eyes! WARNING: Don't attempt to cut teensy weensy images using a sharp object in the wee morning hours! :) Ask me how I know?

For all the details, please visit the Just Us Girls challenge site & be sure to visit ALL the DT girls (found on my side bar) as well as LeAnne & Teresa! Once you have your project photographed, be sure to go to Just Us Girls and post a direct link to your project on our site. If you upload to on online gallery, please be sure to label your project as JUGS33.

Deadline to be considered for the weekly "Chic of the Week" will be 9:00 PM EST on Thursday, May 20th. Our Inlinkz tool will also close at that time. Our top pick "Chic of the Week" will be announced on Friday morning following the deadline.

That's all for today. I will be waltzing along with the Claire, Owner/Designer of Waltzingmouse Stamps, the Waltzingmouse DT & Friends in the Waltzingmouse Stamps Blog Waltz on Monday, May 17th continuing the 1 year Birthday celebration of Waltzingmouse Stamps :) A birthday isn't complete without a cake ;) Hope to see you then! Thanks for looking! Be Sweet!

Supplies Used:

Stamps: Stampin' Up, Papertrey Ink

Paper: K&Company DP, Papertrey Ink

Ink: Copic: E55 Light Carmel, R29 Lip Stick Red, T5 Toner Grey, W-1 Warm Grey, B29 Ultra Marine, Memento Tuxedo Black, Ranger Vintage Photo

Other: Spellbinders™ Nestabilities S4-114 Standard Circles LG, S4-250 Big Scalloped Circle SM, s4-241 Jumbo Scalloped Borderabilities™ Petite, Shapeabilities™ S4-081 Tags Five, W-001 The Wizard, Premium Craft Foil, embossing folders, buttons & twine from stash

post signature

Read More

Homespun Vintage Treasures... PDCC29 53

Mona Pendleton | Wednesday, May 12, 2010 @ 8:57 PM | , ,

Hi There! Time again for another Creativity Challenge at The Play Date Cafe. Here is the card I made using the colors for the PDCC29: Sarah chose this week's gorgeous color palette:I have been having so much fun lately "experimenting" with a variety of techniques that I learned while at the Spellbinders Retreat from the "Senior" DT Leaders (Cathy, Beth & Kim :)
The heart & button embellishments were created using what I refer to as the "embossing & sanding" technique &the blue background was created using the "airbrushing" technique. I will spare you the details here because if you continue to scroll down, you will find the step-by-step tutorials :)

I hope you can join along with this week's creativity challenge. After you have made your project, please head on over to The Play Date Cafe & link your post. If you post your creations in an on-line gallery, please label it PDCC29 so we won't miss them! Be sure to see what all The Play Date Cafe DT girls have created, (on my side bar) & our Guest Designer, Heidi Van Laar. I hope you are able to join along with this week's challenge.

Supplies Used
:
Stamps: Waltzingmouse Sweethearts, Judi Kins Artists Signature
Paper: Gina K. Pure Luxury cs, Papertrey Ink
Ink:
Copic B41 Powder Blue, Memento Tuxedo Black, Ranger Vintage Photo
Other:
Spellbinders™ Shapeabilities S4-014 Timeless Heritage, I2-1002 Butterfly Impressabilities™, W-001 The Wizard™, Copic Air brush, Melissa Frances Vintage embellishment, Fiskars border punch, ribbon, lace, button & brad from stash

First up is Tutorial #1: Copic Airbrushing technique (used to create the background paper on this card):

Supplies Used:
Spellbinders™ Butterfly Impressabilities™
Spellbinders™ The Wizard™
Copic Airbrush
Copic Marker (I used B41 Powder Blue)
Gina K. Pure Luxury cs

Step 1:

If using The Wizard™, assemble your sandwhich like so: White Master mat, tan emboss pad, cs, Impressabilities™, White Master mat. **Note: "sandwhich" may vary according to die cutting system used. **Tip: On a corner, I gently tape paper to Impressabilities™ template so when removing to spray, paper will remain attached to template.

Once sandwhich is formed, run cs through machine. Keeping paper & template together once embossed.

Step 2:
Now you are ready to airbrush background any color you like! Simply place marker in Copic airbrush according to manufacturer's directions.

With a gently sweeping motion from left to right, spray right over the template until you have the shade desired.

***Try mixing it up a bit & use several different colors on the same embossed piece of cs! The possibilities are endless! :) Hope this helps & maybe you will give it a try!

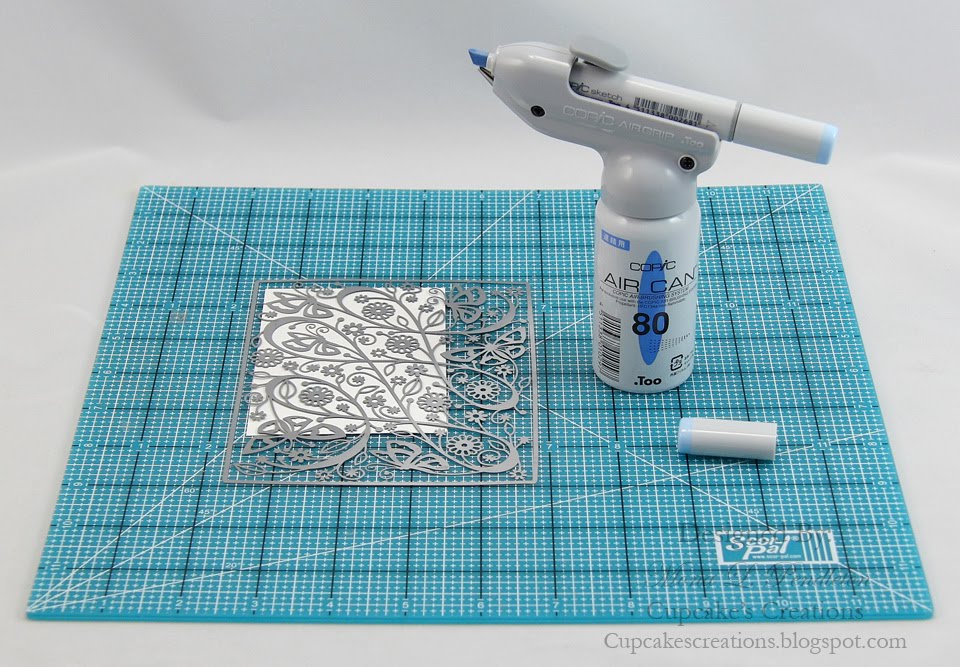
Tutorial #2: Embossing & Sanding Metal like products:

Supplies Used:
Spellbinders™ The Wizard™
Shapeabilities™ Timeless Heritage die templates
Royal & Langnickel Brush Blank Boards

ultra fine sanding block
Steps 1 & 2:
If using The Wizard™, assemble your sandwhich like so: white master mat, magnetic spacer pad, Spellbinders™ die template **blade side up**, blank board/ metal **correct side facing down**, white master mat. **Note: "sandwhich" may vary according to die cutting system used.
Run through die cutting machine then emboss newly cut shapes.
If using The Wizard™, assemble your sandwhich like so: White Master mat, die template with product left in place, tan emboss pad, white master mat. **Note: "sandwhich" may vary according to die cutting system used.

Step 3:


Remove cut & embossed product from die template. Using an ultra fine sanding tool, gently rub over the shape, revealing the metal underneath until desired look is achieved.
& Embossing & Sanding Metal

Supplies Used:
Spellbinders™ The Wizard™
Spellbinders™ Premium Craft Foil
Spellbinders™ Butterfly Impressabilities™
ultra fine sanding block
Step 1:

If using The Wizard™, assemble your sandwhich like so: White Master mat, tan emboss pad, Spellbinders™ Premium Craft F oil, Impressabilities™, White Master mat. **Note: "sandwhich" may vary according to die cutting system used.

Once sandwhich is formed, run through machine then carefully remove separate foil & template.

Step 2:

Using an ultra fine sanding block, gently sand over the shape, revealing the metal underneath until desired look is achieved.
I hope these tutorials provide inspiration for your creating adventures & perhaps you too will give them a try! I would love to see what you make using any of these techniques! Please feel free to email me the link to your project or email a photo :) Feedback is always appreciated :0

Thanks for looking! Be Sweet!
post signature
Read More


Cupcake's Creations Copyright © 2010 Prozine - Designed by Lasantha customized by Scott Pendleton for Mona
Banner graphic elements courtesy: House of Three
Home | RSS Feed | Comment RSS